Saturday, 1 February 2014

Scrummy Saturday Spinach, Watercress, Lardons and French Brie Quiche, with Mustard and Fennel Seed....nothing fancy :)

This is ALWAYS a great way to clear out the contents of your fridge before grocery day and the ingredients tend to vary accordingly in my house :). Sometimes it turns into a frittata if there is chorizo and potato leftovers but today I had baby spinach and watercress that had to be used and some french brie that we have been using on toasties. I grabbed some bacon lardons from my freezer and a half a block of ready made pastry (shortcrust on this occassion, but it could be flaky pastry, it just depends what's in there. I also freeze my own leftover pastry in dough form if I've made surplus to requirements!) and pulled together a quickie lunch for me and mum. As usual my quantities were for 6 servings so enough for a snack later tonight and half for the freezer! Nothing goes to waste!

Melt butter in a medium sized pan added 2 chopped cloves
of garlic and 3 small sliced shallots then cook until softened.

Add about a cup of bacon lardons and lightly fry.
Meantime prepare the pastry. Line a medium oven proof dish with the pastry
and blind bake for 20 minutes at 190 degrees. 
Add two handfulls of spinach and two of watercress to your bacon
lardons and shallots, cover the pan with a lid and let them wilt.
 This will only take a couple of minutes!
Take six eggs and whisk lightly until combined.
 Add a tablespoon of mustard, I used French mustard but you can
 use Dijon, Colemans, whatever takes your fancy.
 Add a teaspoon of fennel seeds and season with
 black pepper and a generous pinch of salt.
Once the pastry is ready cover the base with the savoury spinach and lardon mix.
Transfer the dish onto a baking tray as this will make it easier to
 transfer  back to the oven once the liquid ingredients are added.
Now arrange the French Brie on top. This helps prevent the savoury mix and green ingredients from rising to
 the surface and burning
Pour the seasoned egg mixture over the contents of the Quiche.
Now place in a preheated oven at 200 degrees for around 40 minutesuntil thoroughly baked and golden on top
.If you are unsure that the egg mixture has cooked take a metal skewer and poke into the Quiche around the central area. If the skewer is wet your Quichemay need a longer cooking time, adjust the oven temperature accordingly if you feel the colour is turning too dark. If the Quiche IS cooked properly you will feel a spongy resistance when you poke it! 
And there you have it! A luscious lunch :)
 I honestly can say that previous to my addition of mustard and fennel seed I used to sometimes find a Quiche, no matter how delicious the ingredients a little too eggy and a little too bland. The secret to making it so sensationally savoury is the seasoning and absolutely the 'secret' ingredients I added today!
Bye for now,
S

Friday, 31 January 2014

The Skull Thing and The Storage Thing (a continuing saga!) :)

I'm embracing my dark side and enjoying an ongoing love affair with skulls at the moment so  I started a little painting (gouache and pencil) to bring a little gothesque style to the bedroom glamour! The plan is to mount the finished picture  (and it's nearly done!) onto a canvas prepared with vintage book pages, then create a unique frame using the ancient, well oldish anyhow, art of Quilling! It should look spectacularly olde worlde, lol :) 

So here we have some 'progression' pictures. I found myself a GREAT reference pic for the skull online, and the rose too and got stuck in!


Nearing its completion as you can see and then I'll be fiddling about with rolled up bits of paper till the cows come home and calling it 'Quilling'! 
And for those of you who feel it's all going a tad too dark, don't worry, I have no plans to trendy up and start incorporating stuffed animals into the scheme as I have heard is all the rage (erk?) and I believe that I have made this handsome chappy above look rather the romantic :) 

Oh yeah, and I gave some old seagrass baskets a quick going over with some white emulsion paint to get my hair straighteners and hair drier tidied up and its somewhere to hide my hot water bottle ;). They didn't cost anything as I already had them from my 'Beige Stage' bedroom, which if you saw the before pics was probably as gruesome as amateur home taxidermy could possibly be but yet only involved paint! The tall basket drawers now contain all of my extensive costume jewellery collection, in order, my ear rings, my bracelets, my necklaces...............and my necklaces. They freshened up just great. Stay tuned for more later :)
take care 
S


Saturday, 18 January 2014

Payday Pizza! Chorizo, Red Pepper, Red Onion with Goats Cheese Pizza


So I'm feeling guilty about not posting enough but my life is pretty hectic just getting it together for me and Mum and my solution is to post more of my home cooking! It's something I really enjoy. Messing around in the kitchen concocting grub for Mum and myself is relaxing and we love the tasty results. Last night, Friday, I put together one of my favourite pizzas for a late dinner. It's a delicious Chorizo, Red Pepper and Red Onion Pizza with Goats Cheese. So yummy with a little rocket salad and a nice glass of Merlot! :)
Friday night is a Treat night! I like to make my own sauce and base, which I prefer to be soft and thick, definitely NOT a thin and crispy girl. This will serve 4 people so here is how I do it....

I used self raising flour (), 1 egg, 1 sachet easy yeast, 3 tbsp olive oil, 3 tbsp water
Combine mix until a soft dough forms
Don't laugh but my Mum doesn't own a rolling pin sooooooooo...............................lol :)  (I washed it first!)
Knead for 5 minutes then leave your dough to rest for 20 minutes to half an hour.
Roll out your dough using your preferred rolling device.
Once the dough is around 10 mm in thickness transfer onto a flat baking sheet
For the tomato sauce I used store cupboard dried goods so tomato puree and dried basil simply because its handy, quick and I always have them in stock!

3 tbsp tomato puree, 2 chopped garlic cloves, 2 tbsp dried basil, 3 tbsp of olive oil.
Combine ingredients until oil is thoroughly mixed with tomato paste.
Thinly spread the tomato sauce over your pizza base using the back of a spoon.

Your first topping should always be your mozzarella cheese. I like to use buffalo mozzarella.
Now slice a small red onion and about half a red pepper.
If you lightly coat the red onion and the pepper in a little
 olive oil they will caramelise in the oven.
Chop the chorizo sausage into 10 mm rounds.  
Now add all your toppings onto the prepared pizza base.
 Place into a preheated oven at 200 degrees for around 20 minutes until the cheese starts to colour slightly.
Et Voila!


You can see the base is soft and thick and I can vouch that it was delicious! The spicy chorizo with the tangy goats cheese, sweet red pepper and red onion is one of my favourite flavour combinations for a soft base pizza! Gorgeous!


Thursday, 16 January 2014

Mirror Mirror on the Wall, Who went Skull Crazy? Moi!!!

Well I got a little bit finished, more studs and black paint, with a few vintage mirrors thrown in. I took an inexpensive round mirror and glued it onto a MDF arch shaped mount. I painted it in a black satin finish paint and created a pretty heart shape and border with antique effect silver, copper and gold coloured studs. It worked out pretty well :)


 The whole point being that I wanted a vintage mirror collection for my bedroom! So nails, drill and hammer at the ready I put together a montage of reflections and light framed in metalics. Positioning the mirrors in a corner meant that the light bounces back and forth around the room as the light changes. I also silvered a pair of ornate wall sconces to break it up a little and now all I have to find is a couple of pretty glass perfume bottles to twinkle on them. But on the whole I think it looks pretty glamorous so far :)


I did actually buy something though, my Deer Skull (antelope maybe?) in the picture below is a focal point above the bed and the DIY headboard I have planned. Its gorgeous and solid steel! Nuts!
Ok, that's it for a day or two, I'm about to launch into a Quilling experiment more of which later so have a great day folks. Oh and Nyah the cat and my Mum are just fine although one of them still insists on using the wallpaper in the hall as a scratch post but hasn't killed anything lately. Guess which one? lol.
Bye for now :)
S
Antoine the Antelope/Deer (mon amour francais)


p.s. I just looked at the live blog and realised these pics are rather fuzzy!!! Oh No!!! I promise to get some decent shots and switch 'em over. This is like a 'How to Botch Up Your Blog' post! Apologies to one and all......maybe if you squint?
S :(

p.p.s. Better pics! Not messed about with on the dreadful Instagram. Its starting to come together nicely, can't wait to get the headboard for the bed sorted!

Friday, 29 November 2013

Fabulous Friday Focaccia Foodie Treat!


How we did it, with our delicious home baked focaccia we had truffle pesto with
grilled mozzerella, sauteed mushroom and poached egg. 
So very tasty and the truffle filled the kitchen with its wonderful pungent aroma :) yum. 
We enjoyed every mouthful.
We all know its Black Friday so get out there and support local traders. Myself and Mum are off to a Christmas craft fair at Merville House on Saturday, check it out on Facebook, and we are looking forward to spying the stalls and maybe getting some inspiration from the artisans!
take care and have a fab weekend,
S x


Thursday, 28 November 2013

Especially for Caroline - Sundried Tomato Foccacia Bread!

I can't believe I've managed to post a recipe with pictures as well. I actually did it, so chuffed with myself and the results are great (though I have to say taking decent pictures AND getting decent baking results is not easy!). This is a combination of two of my favourite Focaccia recipes, Gordon Ramsay - Ultimate Cookery Course and Good Housekeeping - The Baking Book.
Gordon adds semolina to his version, as I do here and it really gives your focaccia an authentic Italian flavour. I'm planning on having some of this bread tomorrow for brunch with Mum, and I'll post a little pic for you of our accompaniments :).
So give it go, its tasty and satisfying with an Italian inspired casserole, hearty soup or something a little different perhaps?
However you eat it, enjoy it!

Lets do lunch!
S x

p.s. the last pic is steamed up 'cos it's straight out of the oven! Opps! :)

Sieve 500g flour, 2 tbsp semolina, 14g dried yeast, 2 tbsp dried rosemary, 1 tbsp salt, keep your salt and yeast separate
 ( salt kills yeast!). Make a well, Add 320 ml water
 and 60 ml olive oil,
 mixing your yeast first then combining the remaining dry ingredients
It should be a pretty wet mix, add more water if necessary
Knead for 5 minutes
Cover with a cloth or clingfilm and leave to rise/prove for
 60 minutes, or until doubled in size
Pull dough out onto a lightly floured suface
chop sundried tomatos
Divide dough into two equal amounts, then add sundried tomato and knead again for 3 minutes
Spread dough out as flatly as possible into a oven proof dish, lightly dusted with flour
Leave to prove for a second time for around 40 minutes or until double in size,
then press deep 'dimples' into the dough using your fingers, or the floured handle of a wooden spoon.
Stuff dimples with the remaining sundried tomato,
 I also like to use the 
olive oil used to preserve the  jarred variety 
of sundried tomato to drizzle 
over the bread so nothing goes to waste


Add olive oil, roughly chopped garlic and more rosemary
(dried or fresh depending on your pantry), sea salt and freshly ground black pepper.
 Place in a pre-heated oven at 200 degrees for 30 minutes until golden and thoroughly baked.
et fini!

Tuesday, 26 November 2013

More Bits That Got Finished

Here we are, the remaining pics of my bedroom. You will notice no pics of the ACTUAL bed yet, well that is in progress as we speak. I have a load of food ideas I want to share with you over the holidays, a real Christmas Feast! So stay tuned for home improvements, Christmas outings and FAB food  :)
Ceiling Rose and black chandelier,
 which I bought in a sale at Dunelm Mill

The white coving really makes the room feel finished and defined.

Crystal ball curtain catchers (£2.99) and my thrift shop curtains

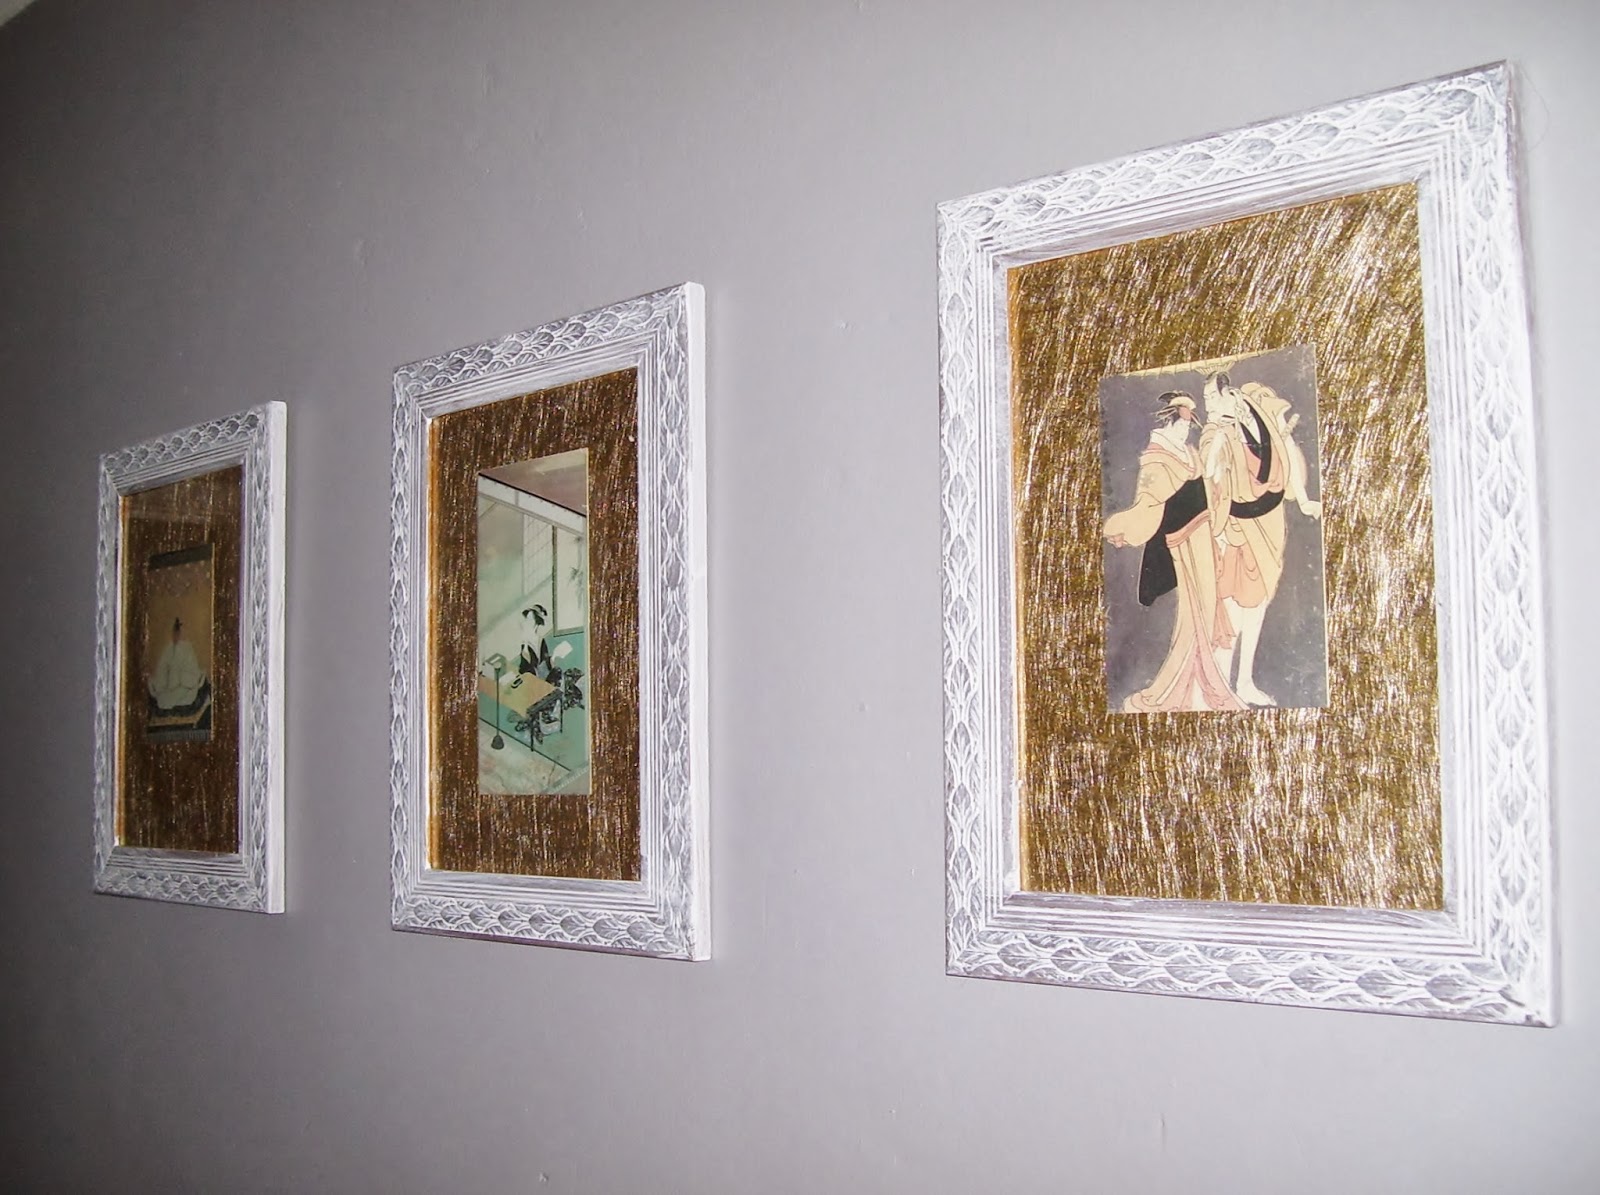
Japanese postcards framed in a white-washed wood
with a gold paper mount surround.
The frames were £1 for all 3 at a car boot sale,
and the postcards are from my Aunt Gloria to my family decades ago


Thrift shop curtains and small vignette of objects on my Studded Cabinet

3D Elephant in black frame from Tkmaxx at about £7 <3,
Japanese Lady in white a gift from my Mum.
I used to play with it when I was a little girl :)

P.S, don't forget to look at the 'before'!!
  • 'And so we move on to the REAL problem area.' my before post in August!
  • Take care folks, S x